
This review will walk through the features and setup of the Vangoa VPPD-S Pedalboard.
If you’re looking for a small-sized pedalboard on a budget with a built-in power supply, this review is worth reading.
Vangoa VPPD-S Pedalboard Features
Here are the main features of the Vangoa VPPD-S Pedalboard:
- Aluminum alloy pedalboard frame
- Built-in 9V power supply
- 8x isolated 9V 100mA power outlets for pedals
- LED audio level indicator strip
- Foldable legs
- Padded carry case
- 2x velcro strips
- 1.3kg (2.8lbs) total weight
- 410 x 165 mm (16.1″ x 6.5″) pedal surface area
Here are the pedalboard and accessories that come with the VPPD-S Pedalboard:
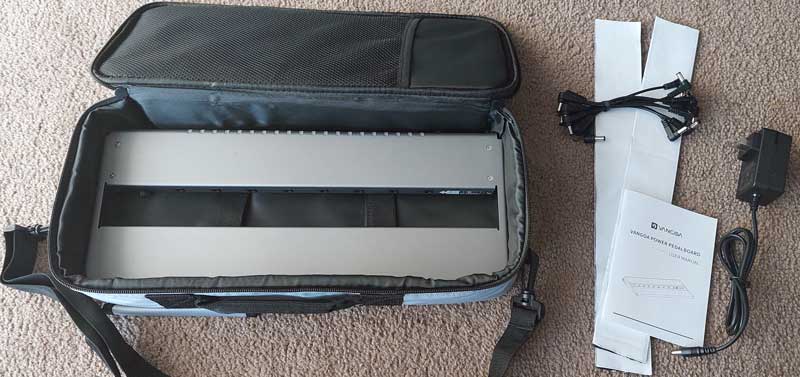
The pedalboard comes with 2x hook and loop velcro strips, 8x DC cables, and a US power supply.
Note: I live in Australia and the pedalboard came with a US power supply. So I had to buy a suitable power supply (18V with inside(+) connector and 1A minimum). If you buy this pedalboard outside of the US, you will need to buy a suitable power supply.
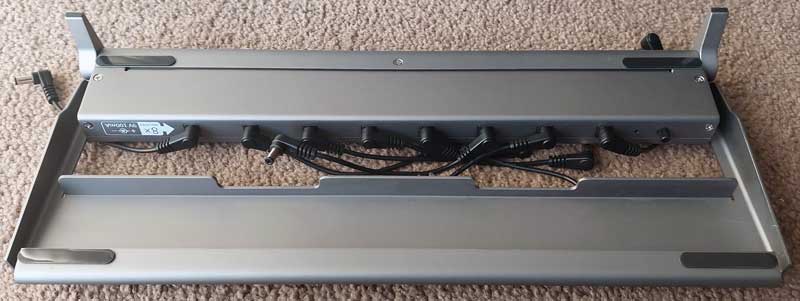
Built-in 9V Isolated Power Supply
The feature I found the most interesting on this pedalboard is the built-in power supply.
Many popular pedalboards provide you only with the frame and require you to purchase a power supply and mount it to the frame on your own.
For a small to medium-sized pedalboard, it makes far more sense to have a built-in power supply.
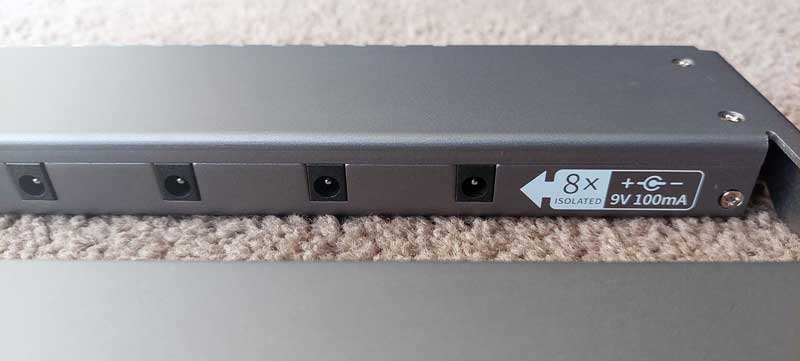
The built-in power supply provides 9V with up to 100mA of power for each of the 8x isolated outlets.
Find out why isolated power is important in my review of the Voodoo Labs Pedal Power 2 Plus power supply here.
The main benefit of isolated power outlets is it prevents any interference between different pedals that can impact your guitar tone.
Not all guitar pedals are equal and many pedals can create interference that not only affects your tone, but can affect other pedals connected to the same power supply. Isolated power can prevent this issue.
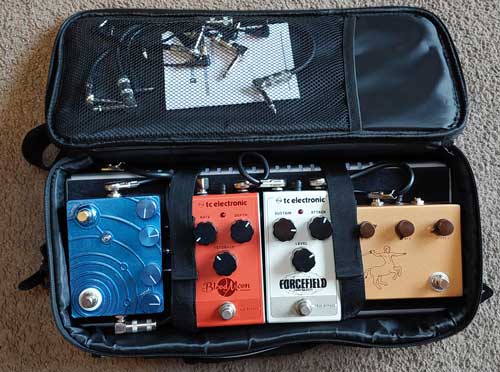
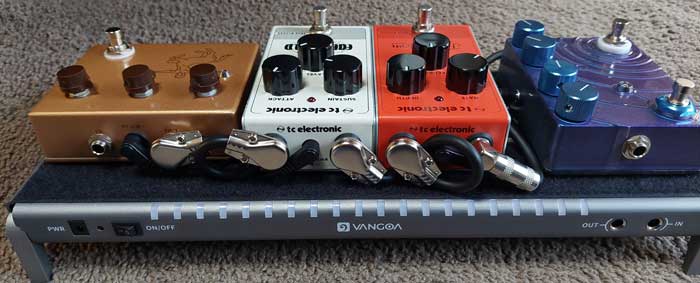
Having 8 power outlet points gives you flexibility with how you set up your pedals.
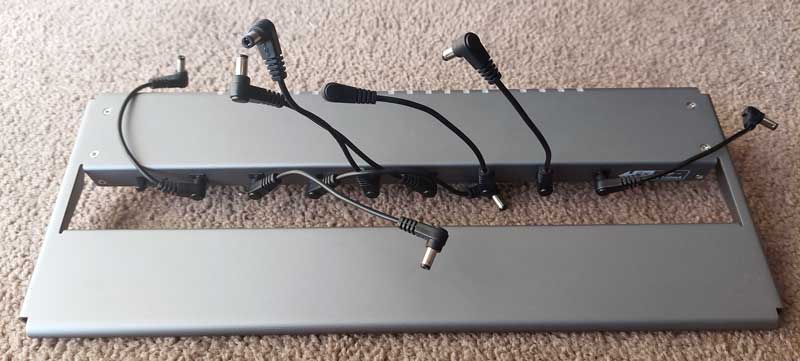
In the above photo, you can see that you can position your pedals in any way and reach them with the connectors.
The VPPD-S pedalboard fits 4-5 normal-sized pedals, so having 8 power outlets is more than enough. If you use mini-sized pedals, you can squeeze more on your pedalboard and still benefit from using isolated power for each one.
You could potentially use some of the spare power outlets to power other pedals such as a wah you may sit on the floor. Just be sure that the pedals you use don’t require more than 100mA.
Foldable Legs
The VPPD-S pedalboard has two foldable legs to switch back and forth between leaving the pedalboard flat or tilted.
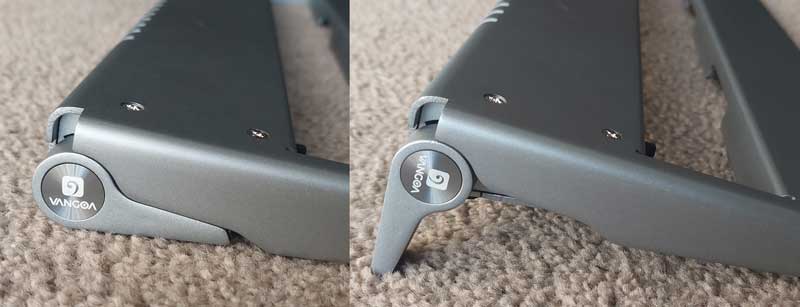
The legs may look thin in the above photos, but they feel solid and fit firmly in place when folded out.
While I’m not going to try and jump up and down on the pedalboard to test their limits, they feel sturdy.
Rubber pads across the base of the pedalboard help keep it from sliding around:
A plastic film comes on these four rubber pads, so if you find your pedalboard slides around try removing the film.
The only time the legs folded back was when I purposely tried to push the pedalboard forward with my foot. It felt sturdy during normal use.
LED Strip
An interesting feature found on the Vangoa VPPD-S is an audio level indicator strip running across the back of the pedalboard:
The LEDs react to the audio level in two ways: in-built microphone, or from the signal path connection.
So if you don’t plug into the IN and OUT jacks (see above right photo), the LED strip will use the in-built microphone to detect the audio level.
The above photo shows the entire strip lit up as I shouted behind my camera. That should give you an idea of the audio level required to max out the LEDs.
If you do pass your signal through the IN and OUT jacks, the LEDs will react to your signal strength.
You can adjust the sensitivity of the LEDs (only when plugged in) by adjusting the small potentiometer shown below:
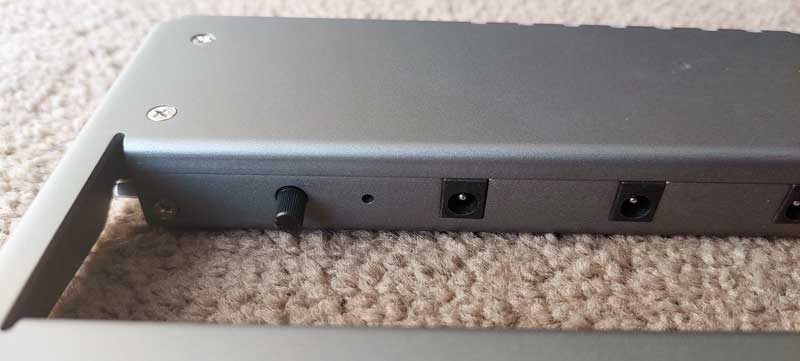
Adjusting this knob will only change the LED sensitivity when your audio signal is passed through the IN and OUT jacks. It won’t adjust the strip when the internal microphone is used.
The LEDs are at an ideal brightness level. They’re not over-the-top bright like many pedal LEDs so you’re not going to be blinded during night or on stage.
Carry Bag
The pedalboard arrived in a padded bag with an attached strap and rubber protection feet:
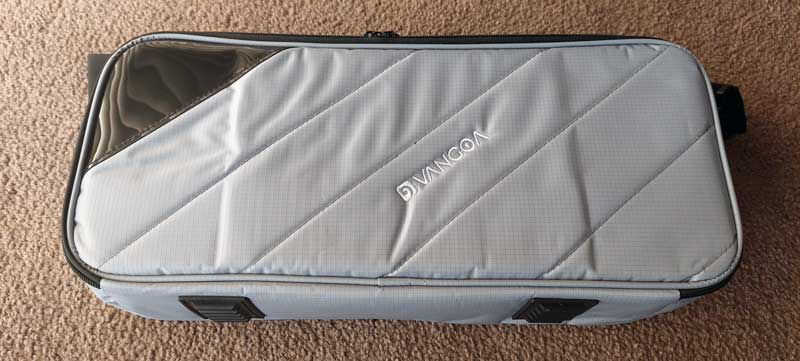
The pedalboard has a snug fit inside the bag, but the bag is deep enough to fit your pedals without any problem.
Two internal straps can be used to help keep the pedalboard in position during travel.
The bag became a bit crowded when I tried to pack in the power supply. Depending on how crowded your pedalboard is, you may need to pack the power supply separately.
The back of the carry bag has a velcro strap you can use to wrap around a guitar bag:
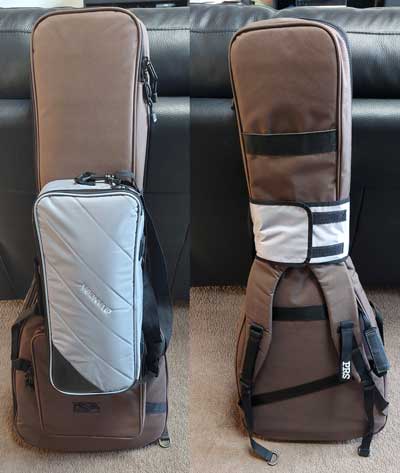
While you can easily use the shoulder strap, it’s a nice idea to strap the bag to your guitar bag and free up your hands.
The thickest padded guitar bag I use is the above PRS SE and the Vangoa strap could easily wrap around it.
How to Set Up a Pedalboard
If you haven’t set up a pedalboard before, here is a quick walkthrough of the basic steps and tips to set it up right.
Step 1: Prepare the Pedalboard
Before you add pedals to your board, attach the velcro strip to the surface of the pedalboard.
The Vangoa pedalboard arrives without the velcro strips attached so you can decide whether to use them or not.
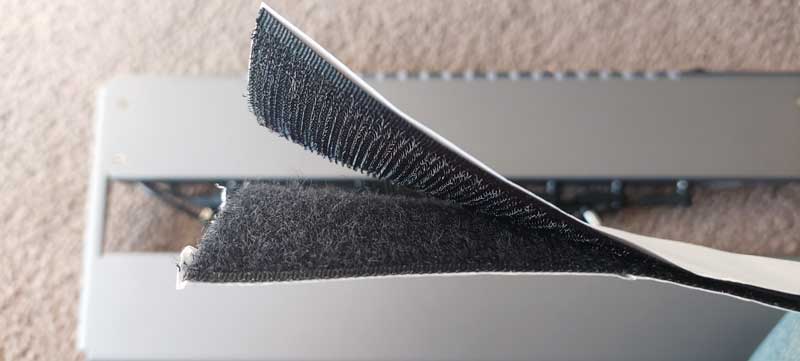
The two hook and loop strips are more than enough to completely cover the pedalboard as well as the back of your pedals and have enough spare for one or two spare pedals.
As you will see, the width fits the pedalboard perfectly (2″ or 5cm).
Which side of velcro goes on guitar pedals?
While you can use either side of velcro on guitar pedals, the most common method is to use the fuzzy side on the pedalboard and the hooks side on the back of your guitar pedals.
As with every guitar topic, there’s always debate on what is the right answer. Some guitarists prefer to have the hooks on the pedalboard while others prefer the fuzzy side.
The reason I set up my pedalboard with the fuzzy side on the pedalboard is because it’s more common, so you’re more likely to find second-hand pedals with the hooks side already attached to the pedals.
Another benefit of using the hooks side on the back of your guitar pedals is if you play at home on carpet. You can sit extra pedals on the floor and the hooks will help keep the pedals in place on the carpet.
Even if you won’t be using the entire space for your pedals, I recommend covering the entire pedalboard surface in velcro. If you add more pedals in the future, you won’t need to worry about adding more velcro.
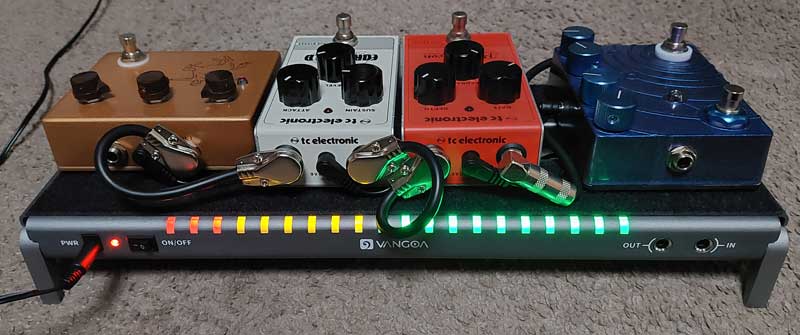
Step 2: Arrange Pedals
Now you can plan out the arrangement of your pedals.
First, line up the pedals in order of signal path. Keep in mind that pedal signals normally go from right to left (inputs on the right of the pedal, outputs on the left).
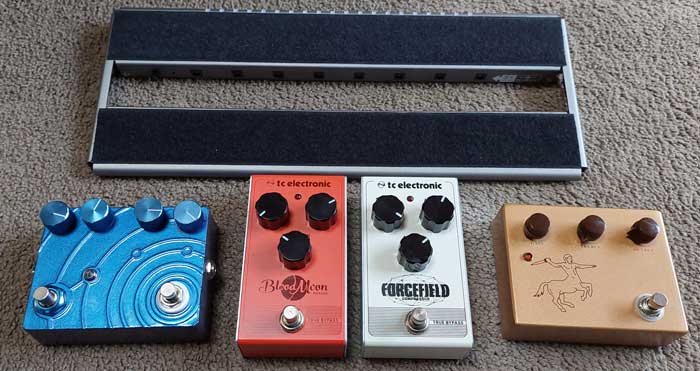
In this example build, I wanted to see if I could cram in a few large-ish-sized pedals. As you can see from the above photo, the pedals are too wide to fit on this pedalboard. So if you plan on using 4-5 standard pedals (or 6-7 mini pedals), you should have no problem fitting them.
From right to left, they are:
- Klon Centaur clone (built from a kit as explained in this guide)
- TC Electronic Forcefield Compressor
- TC Electronic Blood Moon Phaser
- DIY built reverb (learn about building your own pedals here)
The drive pedal is first in the chain, followed by the compressor, then the phaser, then the reverb.
To learn more about finding the best order for your pedals, check out my Guitar Effects Course. It walks you through all common effects types using audio examples and explains how to get your pedals to work together.
Once you figure out the order of your pedals, you can figure out the best arrangement on the pedalboard.
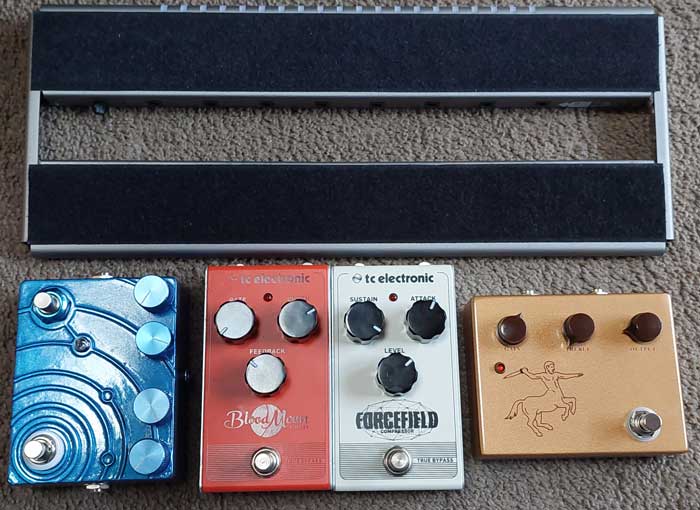
In this example build, you can see that all I needed to do to fit all the pedals was to rotate the reverb pedal by 90 degrees. As that pedal has two footswitches, it worked out well having it at the edge of the board.
Pay attention to the positions of the power jacks and input/output jacks.
Step 3: Add Patch Cables
Once you are happy with the order of your pedals and how they will roughly sit on the pedalboard, you can add your patch cables.
Patch cables are short guitar cables used to connect pedals together. Check out the different lengths and types of patch cables here (link to Amazon).
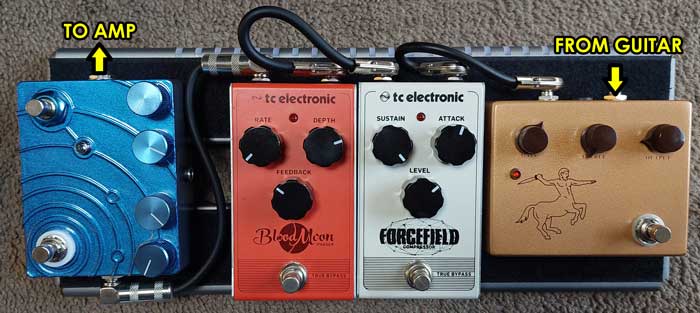
The patch cables are only used to connect pedals together. The input jack on your first pedal and the output jack on your last pedal will remain empty as shown above.
You can see in the above photo that I’m using two different types of patch cables as they have different lengths.
It’s a good idea to buy a few different lengths so you can swap cables in and out as needed for the best fit.
Step 4: Connect Power Supply
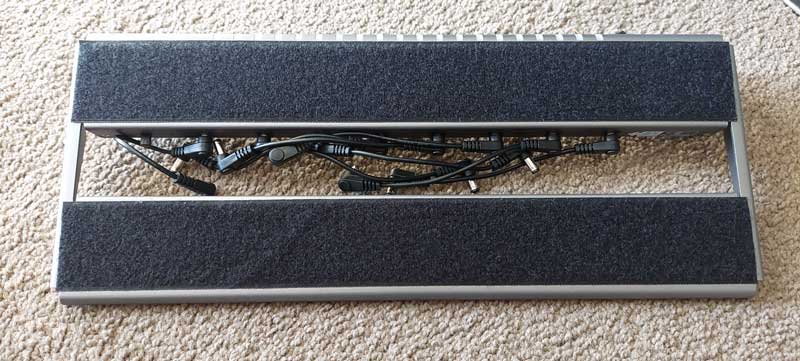
Now you can add the power cables to connect to each pedal.
The Vangoa pedalboard comes with 8 power cables and 8 points to connect to. This should make it easy to connect to any arrangement of pedals you need.
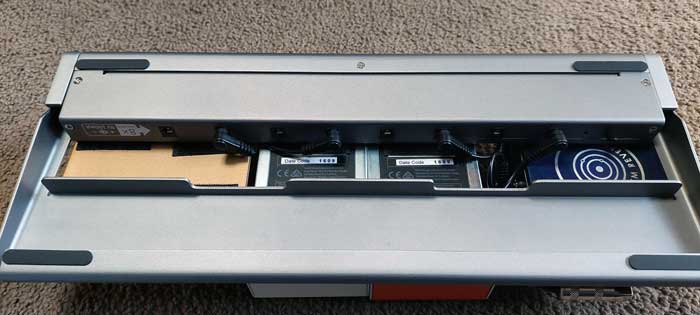
By flipping the pedalboard over, it was easy to figure out which connection points to use to fit with each pedal.
Now you can maneuver the patch cables and power cables to try and fit everything as neatly as possible.
You may need to slightly adjust your pedal positions to get the best fit. Try to avoid having cables stick over the edge if you plan on using the carry bag.
You can also decide whether you want to use the IN and OUT jacks on the back of the pedalboard:
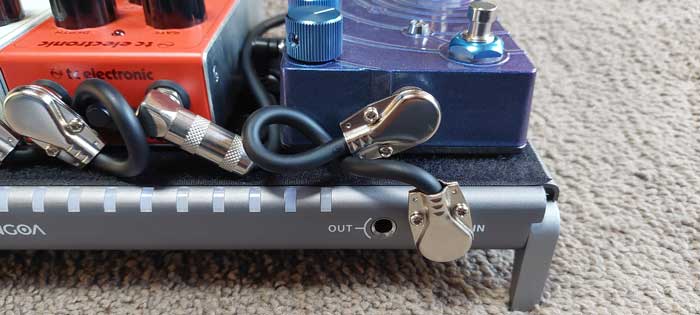
The main benefit of using these jacks is convenience. When setting up your rig in a performance, you know you simply need to connect a cable from the OUT jack to your guitar amp.
If something happened and the cable was tugged, instead of it potentially damaging your pedal’s jack, it would only tug on the pedalboard.
Of course, if you use a stereo rig, these jacks won’t be of any benefit to you.
Overall Impression of the Vangoa VPPD-S Pedalboard
The features and build quality of the Vangoa VPPD-S pedalboard make this an easy option for guitarists who want something simple and affordable.
I’ve never been happy with how expensive some well-known brands charge for a basic metal frame. The built-in power supply makes a big difference.
The built-in power supply makes this an easy plug-and-play pedalboard. If your pedals can run on 9V and don’t need more than 100mA of current, the built-in power supply will work fine.
While the VPPD-S may be a bit too small for many guitarists, it’s a great starting point for building your first pedalboard.
Overall, I’m impressed with the build quality and range of features of the Vangoa VPPD-S. If they extend this model to larger pedalboards, it’s going to be an easy buy for a lot of guitarists.
Vangoa VPPD-S Pedalboard Pros
- Built-in isolated 9V (100mA) power supply
- 8x power connection points
- Good build quality
- Good carry case and accessories
Vangoa VPPD-S Pedalboard Cons
- Only ships with US power supply
SOURCE FROM: Aaron Matthies - guitargearfinder.com

Share:
THINGS YOU SHOULD KNOW BEFORE LEARNING THE GUITAR
Vangoa VPPD-S Power Pedalboard review – a low-profile ’board with a built-in power supply, could this be the perfect compact solution?